Introduction

Building my very first 3D printer was quite traumatic and time consuming but also fun and rewarding! I don’t suggest building your own unless you have a love for tinkering, and making. There are some other qualities that will come in handy such as tendency’s for hacking, electronics, and computers. As this is a computer controlled machine complete with a microcontroller you MUST know how to turn a computer on. Be aware that building your own RepRap is more like getting a hobby than getting a project.
Are you still reading?… then this article, along with the over a dozen videos, may help you build your Mendel with hopefully fewer issues in the build process and also give the confidence to others to take the plunge and build one!
 What is RepRap?

3D printing is a up and coming movement where people are building machines that can make plastic parts and indeed make the parts for other 3d printers. This phenomenon is referred to as self replicating as a RepRap makes the essential parts for new RepRaps. There is a lot that can be learned on RepRap.org The RepRap is a rapid prototyping machine that can manufacture just about any plastic thing you can imagine.
Sourcing Parts
You can find fully assembled RepRaps for sake online however don’t think that you can buy one and plug and play. There will be quite a bit of learning, calibrating, and configuring software before you can print.
If you are a maker you should consider picking up the parts and building one for your self. There are a lot of different Models of RepRap out there, in this article the model we will be building is a Mendel which at this time seems to be the most popular model. These links may be helpful: RepRap Mendel Buyers Guide and Mendel Materials Pocurement
Kits
For the first time RepRap builder the simplest and most likely the cheapest way to get parts is to purchase a kit. You will find that shipping quickly adds up and can offset the savings of sourcing all the parts yourself if you don’t have local sources for the parts. You can get kits with all parts, most parts or some parts. Doing a web search should return lots of different RepRap kits, you can also check out the RepRap Mendel Buyers Guide where a partial list of vendors is kept.
1 Parts and Unboxing
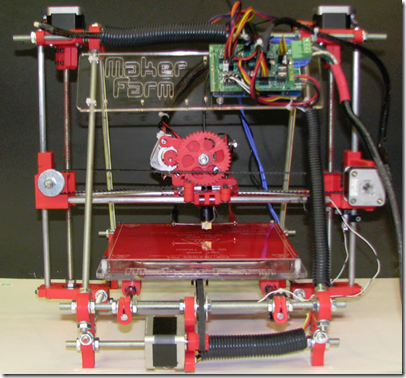
I purchased a kit from MakerFarm.com/. The kit had everything I needed aside from smooth and threaded rods, power supply, and stepper motors. The did have a kit that came with stepper motors but I accidentally purchased the other one. Here I show unboxing the kit and cutting the rods to length. I aquired the PC Power supply from Ebay for about $25.oo and the rods from Lowes and Ace Hardware for around $40.00.
2 Frame Assembly
Assembling the frame is not to hard, you will need some wrenches and a measuring device in MM. a nice 18” ruler that has MM is very nice to have. I liked the visual instructions found on MakerFarm.com. I am not sure if they came up with the instructions but don’t find them on the RepRap wiki. You can also try to follow the build instructions on the RepRap.org wiki Mendel_Build_Manual
3 Y Axis Assembly
4 Stepper Motors Pressed Gear Removal
5 X Axis Assembly
6 Greg’s Accesable Extruder Assembly
7 Z Axis Assembly
8 Ramps Electronics Assembly
9 Connecting Electronics
10 Power Supply
Lots of people use PC power supplies to power their RepRap. It is more straight forward to just get a 15-20 amp 12 volt power supply but a PC power supply may be cheaper. You will need to slightly modify the PC power supply to get it to work. I suggest getting something over 500 watts.
12 Hardware, Firmware, Software
You will need to select the firmware you would like to run on your microcontroller and also the CAM Computer Aded Manufacturing software, there are a ton of options. You can read more about these options here: http://reprap.org/wiki/RepRap_Options
Your choices may differ but so you know what will be shown in the video below my choices were an Arduino Mega with RAMPS board for the microcontroller, Sprinter for the Arduino firmware, Printrun for the CAM software, and Google Sketchup for the CAD software.
Here is a rough list of the software needed.
- Firmware
- IDE to load the firmware
- CAM software
- CAD software
Here is a detailed description of the Sprinter firmware and how to configure it.
If you have never programmed an arduino you might get some information out of this video.
4 thoughts on “RepRap Prusa Mendel V2 Complete Build”
Loved the tutorial and the YouTube videos. How long/ number of hours did the entire assembly take? It’s tough to tell from the YouTube videos since it was time lapsed.
Thanks! I had an hour or two of footage for each video so I would say it took about 20 – 30 hours. My second 3d printer will be much faster!
Great job! Thanks for sharing this. In the power supply video you show 4 wires going from the power supply to the RAMPS shield. Why are there 4? Are 2 from the yellow and 2 from the black group of wires?
The RAMPS board has two 12V inputs, one for powering the electronics and one for high draw stuff like the motors and heaters. The two sets of wires are both going to the same 12V buss. This separation helps segregate the critical electronics voltage from motor spikes or draw down and prevents your electronics from experiencing low voltage brown out. The wire I am using is # 10 which is overkill and would probably prevent any low voltage situations but why not be sure. Some PC power supplies have two 12V rails, in this situation you would use the smaller 12V rail for powering the board and the higher capacity 12V rail for powering the motors, as my power supply has a single 12V rail both inputs on the RAMPS board are getting power from the same buss.